Wednesday, October 24, 2012

Messenger Bag Tutorials - DIY Messenger Bag Collection


 Messenger Bags:  I love them, but can never seem to find the right one in the right color and material in the right price range.  Messenger Bags are wonderful accessories.  Their demographic spectrum spans the full range from seniors to young adults to the kiddos.  I'm sharing my personal favorites in this collection. 


The Weekend Designer is incredible.  This is a blogger that knows fashion and shares his knowledge with those of us fortunate enough to find his site.

Ecolution Messenger Bag Tutorial on Pinterest


Push The Envelope - Messenger Bag by Weekend Designer


 Zaaberry posts some really cute bags.  Try this one if you're looking for a special bag to make for your special child.

Kids Messenger Bag Tutorial on Pinterest


Kids Messenger Bag by Zaaberry


I fell in love with the braided belt strap when I first saw this Messenger Bag on Pinterest.

Messenger Bag Tutorial on Pinterest


Braided Belt Messenger Bag by Cold Hands Warm Heart


I had to share this Messenger Bag, Lunch Bag, and Backpack collection of bags by Me Sew Crazy.  As I said in the Kids Backpack Tutorials - Adorable DIY Backpack Collection post, she is one of my favorite bloggers and designers.

Circle Backpack, Messenger Bag, and Lunch Bag Tutorials on Pinterest


Circle Bags: Backpack, Messenger Bag, and Lunch Bag by Me Sew Crazy


What could be easier than a Messenger Bag made from a pillowcase?  I think this would be a great bag for a beginning seamstress.

Pillowcase Messenger Bag Tutorial on Pinterest


Pillowcover To Messenger Bag by living with punks


Make it and love it hit a home run with this convertible Messenger Bag.  The perfect blend of fashion and function for moms with little ones.


 New Green Mama posted an excellent tutorial with lots of details and photos.  She makes this bag look easy.  I love the fact that it is reversible.

Reversible Messenger Bag Tutorial on Pinterest


DSC_4452-edited 2


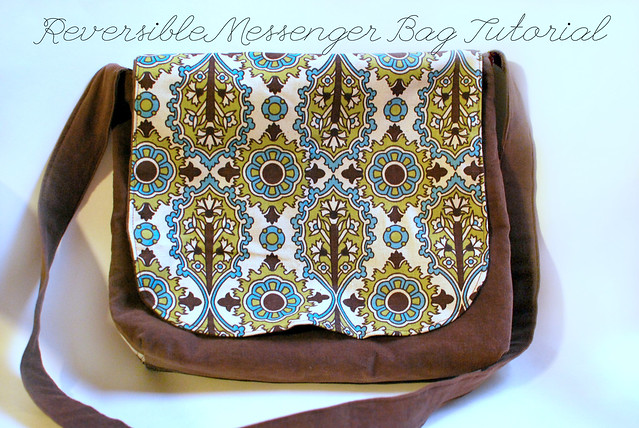
Reversible Messenger Bag by New Green Mama


Stash Books has a wonderful Messenger Bag designed especially for traveling with kids.  They offer a great tutorial, free pattern, and different versions of the bag to fit different ages and sizes of kids.

Travel Messenger Bag Tutorial on Pinterest


Travel  Messenger Bag by Stash Books


 A very detailed tutorial with step by step photos is given for this Messenger Bag by BLUEBIRDBABY.  Using a solid color with an accent trim, you could make several in different colors to match different outfits.


Messenger Bag Tutorial on Pinterest


New messenger bag tutorial!!


Messenger Bag by BLUEBIRDBABY


The Basic Messenger Bag by mmmcrafts is simple and straightforward.  She doesn't give the tutorial for the design on the flap.  However, if you're not a beginning seamstress, I bet you could come up with several ideas based on looking at these designs.

Basic Messenger Bag Tutorial on Pinterest


Basic Messenger Bag by mmmcrafts


Did somebody say Decoupage?  Decoupage on a Messenger Bag?  I'm in!!  I love this one by Honestly..., and it is a NO - SEW version!


Decoupage Floral Bag Tutorial on Pinterest


Decoupage Floral Bag by Honestly...


I had to include one more Messenger Bag for the mommies and the babies.  This Messenger Bag is designed to be a diaper bag!


 Messenger Diaper Bag Tutorial on Pinterest


Messenger Diaper Bag by Gluesticks 


I pinned this upcycle Messenger Bag on Pinterest long ago.  It is made from a pair of cargo pants!

Messenger Bag Tutorial on Pinterest


Messenger Bag From Cargo Pants by Wonderwoman Creations


I hope you enjoy this collection. I truly admire the creative genius behind these designs.  Please let me know if you decide to make one!

Saturday, October 20, 2012

Mess Kit Tutorial - Dollar Store DIY

Ever thought about making a simple Mess Kit to use for camping?  I made this one for YW Camp.  I learned to make them years ago as a teenager.  They work great.  I wanted to share a quick tutorial so you could make one, too.  FYI this is a great project for a beginning seamstress.  It is very simple.

 
DIY Mess Kit


All the materials for constructing and filling the Mess Kit are available at Dollar Tree.  

Supplies


  • Plastic Mug with snap-on lid
  • Two Dish Towels
  • Pie Plate
  • Fork, Knife, and Spoon
  • Shoestring
  • Scissors
  • Sewing machine and thread (for machine sewing) or Needle and Thread (for hand sewing) 

Mess Kit contents


 Directions


1. Cut one dishtowel in half so that you have two squares instead of one rectangle.  Stitch across cut edges to prevent them from unraveling.

2. Fold over, wrong sides together, one and one fourth inch across the long edge of the other dishtowel and stitch to create a one inch casing for your drawstring.

3. Fold dishtowel in half, right sides together, matching seam casings, and stitch around two sides, leaving casing side open.  Do not stitch through the casing.

4. Turn dishtowel right side out.

5. Pin a safety pin to the end of your shoestring.  Insert the safety pin into the casing.  Pull the safety pin and shoestring through the casing until you have shoestring extending from both sides.

6. Remove safety pin.

7. Even out the shoestring so there is an equal amount extending from each side.  Stitch the shoestring to the casing near the center of the shoestring.

8. Tie one or two knots near the end of the shoestring.  This will make it easy to hang up on a tree or a hook.  


Mess Kit contents

Usage Instructions


Use one of the matching two square dishtowels as a napkin.  The other can be used as a placemat.  After using the Mess Kit, wash the dishes using one of them as a dishrag to help clean your dishes.  Then place the dishes and the dry dishrag inside the mess kit and hang from a tree or post to dry.  Hang wet dishrag separately and return to Mess Kit when dry.


Pie plate, mug, utensils, napkin and placemat/dishrag easily fit in bag.

I already had the sewing machine, scissors, and shoestring.  The other supplies cost about five dollars at Dollar Tree.


Mess Kit with all contents inside.


Everything fits neatly inside.  It is just a little difficult to make photos when you have a big puppy dog that wants some attention.  Bruno is the alpha male amongst our dogs.  He is not easily dissuaded.


Bruno just wanted to play.


I hope you have fun making your own Mess Kit.  Please let me know if you have any questions about the tutorial.

This tutorial is shared at:

Cutesy Crafts: An Oldie but a Goodie #13 

Diana Rambles Pin Me Linky Party #25 

Gunny Sack Link Party #60 

Craft-O-Maniac Monday 

Skip to my Lou Made by You Monday 

Sew Can Do Craftastic Monday Link Party 

You are invited to visit the link parties and see all the wonderful posts.

Friday, October 19, 2012

Big Tex Burns - Texas State Fair Landmark Gone Forever


It is a sad day for fans of Big Tex, the Texas-sized talking cowboy statue that greeted patrons on the Texas State Fair Midway for decades.  How could they possibly replace this beloved TSF icon?

I grew up in Dallas and attended public schools there.  Every year students got a free pass to the fair and even a special school holiday so we could attend during the week.  We always looked forward to seeing Big Tex on the midway talking to everyone, welcoming them to the fair.  This is a sad day.

However, the photo is incredible.  It is less than two weeks before Halloween. The frightening, fiery image looks like it belongs in a State Fair Halloween movie.

Thursday, October 18, 2012

Disney Cinderella Password Journal - Expert Review

I'd like to introduce our expert, my 9 year old granddaughter BELLE.  She is the apple of my eye!

Belle with her Cinderella Password Journal

Guess what her PAPA and I surprised her with for getting all A's on her report card?  Yep, a new Disney Cinderella Password Journal.  I think the price varies, but we got hers at Walmart for around $20.

According to her mother, BELLE carries this journal everywhere.  At this age, she is ready to start keeping a diary or journal.  The timing was perfect.  She'd just been to a birthday party where the birthday girl got a similar electronic journal.  BUT it wasn't a DISNEY PRINCESS PASSWORD JOURNAL.  

HUBBY and I are not in on all the latest fads, but we hit a home run with this gift.  She absolutely loves it!!  Here are the answers she gave when I asked her what she liked best about it:

1. It opens to my voice only. (voice recognition lock)
2. It lets me see in the dark. (adjustable bright/soft light when open)
3. It keeps everything private. 

BELLE's advice to grandparents or other potential gift buyers out there looking for a gift for a 9 year old girl?  The Disney Cinderella Password Journal is awesome.  Girls will love it!

Disney Cinderella Password Journal $20

 This is the description from Walmart.  Right now there are no good links to purchase it.  Walmart has it available 'in store' but not online. 


Disney Cinderella Password Journal


The Disney Cinderella Password Journal has privacy inside and out. Your child can record her own special password. The journal only opens to the sound of her voice! Spring-loaded doors open automatically. Girls can switch from show light to glow light and reveal their innermost thoughts and awesome adventures.

Disney Cinderella Password Journal:

  • Record your own password
  • Only opens to the sound of the owner's voice
  • Spring-loaded doors open automatically
  • Switch from show light to glow light
  • Auxiliary jack for connecting MP3 or CD players
  • Requires 3 AA batteries (not included)


BELLE takes her Cinderella Password Journal everywhere.


Saturday, October 13, 2012

A New Hairstyle - The Perfect Pick-Me-Up


What makes a woman want a new hairdo?  Every woman wants to feel like she looks her best.  Sometime a look or hairstyle becomes...well...tired.  When you get up in the morning, put on your makeup, get ready to fix your hair, and say to yourself, "Well, I'm just not sure what I can do with THIS hair," that is a sign that you may need a new hairdo.   For me, there is nothing in the world that makes me feel prettier and more refreshed than a new hairstyle and some fresh color.


Hair After New Style and Color

I'm not certain whether it is courage or foolishness that prompts me to share with you the unretouched before photos as well as the after photos, but here goes.

Throughout the last 20 years, my hair has become thinner and thinner.  I was definitely in need of a change.  I searched the web for hairstyles that were attractive on people with thin hair.  The beauty advice on the web showed examples of celebrity hairstyles that might also look pretty on women with thinning hair like me.  

Several variations of the pixie cut were shown, so I picked a handful, printed them out on paper, and headed off to my hair appointment.

These were the options, in no particular order, that I considered:

Hairstyle Option One


Victoria Beckham Photo from Hairstyleaa.com


Hairstyle Option Two


Natalie Maines Pixie Haircut
Natalie Maines Photo from Sengook.com


Hairstyle Option Three

http://www.celebrityhairstyles2011.org/wp-content/uploads/2011/11/Dannii-Minogue-Lastest-Hairstyles.jpg
Dannii Minogue Photo from Celebrity Hairstyles


Hair color Option One


Hollywood's New Crop: Short Hairstyles of the Stars
Jenna Elfman Photo from About.com Celebrity Style


 Hair color option Two

Jane Fonda 1024x768 Wallpaper 11540
Jane Fonda Photo from Lemur Publishing

Just before my hair appointment, HUBBY came home from his regular Saturday morning fishing expedition.  FYI, HUBBY would tell me I looked beautiful if my hair looked like Phyllis Diller's and I was wearing a gunny sack.  At any rate, I asked him which one he liked.  He almost NEVER wants to help me choose a style.  He says he likes it any way I do.  Such a sweetheart!!!  But today, he actually picked one.  Guess what?  It was the same one I picked, Option Three:  Dannii Minogue!  The color option I liked best was Option Two:  Jane Fonda.  I love all the color variation.  However, I told Tiffany, my stylist, that I didn't want THAT much blonde.


This is what my hair looked like just before the new hairstyle:


Hair Before New Hairstyle


Hair Before New Style, Side View


This is me at Hair Zone after Tiffany put the color and foil on my hair.  HUBBY said it would be a great Halloween costume, bahaha!


And this is how it looks after the new style and color.  Tada!  I love it.  

Hair After New Style and Color


Hair After New Style and Color
 

Friday, October 12, 2012

DIY Music and Quote Inspiration Wall Makeover


I've always said that my house was too "brown".  Literally.  Two thirds of the walls are covered with wood paneling.  You know, the kind that was popular back in the 1960's and 1970's?  Yep, that's the stuff.


In case you are not familiar with the trend in home interiors that was popular during part of the last century, I'd like to present Exhibit A:

Exhibit A - Wall covered with brown tone wood paneling.
 It may give a rustic appeal to the interior of a fishing cabin, but it grows tiresome once you've lived with so much of it in your home after a decade or so.

Truthfully, this wall is looks better than the wall that is in the photos.  That wall was the 'kid' bedroom for years.  PRINCE, PRINCESS, PEPSI, and PUMPKIN literally put stickers all over that wall...and then scribbled on it a bit.  But...it is made from the same material as this wall in another room.  Since I didn't do this project myself, there is no 'before' photo of that wall.

PUMPKIN is the youngest, and she got that room the siblings moved out.  She deserves all the credit for the quotes and music covering the wall.  When PRINCE moved back home, he needed a place to hang his beautiful guitars.  


I really love this.  The guitars are organized neatly on their hooks and beautifully displayed.  The wall in the background gives the whole room a feeling of creativity and inspiration.


If you want to re-create this, find your own quotes and write them on pretty scrapbook paper.  Then just find printable music on the computer, buy some thrifted music books, or use your old sheet music from high school.


Hang those beautiful guitars or other appropriate instruments on your wall so that everyone can enjoy them.  Let's face it, if you can get to them easily, you're much more likely to use them, right?


I really enjoyed taking these photographs.  As I said before, PRINCE and PUMPKIN deserve all the credit for the beauty that was created on the wall.


If you feel inspired to do this, please let me know.  I'd love to hear about it or see your photos! 

 This post is shared at:


Chic on a Shoestring Flaunt It Friday 122 Link Party 

Gunny Sack Link Party #59 

Wednesday, October 10, 2012

DIY Baby Changing Table Makeover - A Tutorial

We really love the way this Jenny Lind style Baby Changing Table Makeover turned out.  Believe it or not, we didn't deliberately set out to find a changing table and revamp it.

Jenny Lind style Changing Table - After Makeover


Our daughter, PEPSI, and her Grandmother-In-Law bought this as a project to do together.  They weren't able to finish it in time before PEPSI and her family moved to south Texas, so it was left at PEPSI's G-I-L's home.  Soon after the big move, we found out PEPSI was expecting a new baby! The project was given to HUBBY and I, with the request that we bring it to PEPSI.

I wanted to finish it for them so they could use it when the new baby was born.  Honestly, I wasn't planning on working too hard on it.  Just throw on some paint, fix the shelves, and voila.  That was before HUBBY was brought in to help with the makeover.  HUBBY is a professional painter.  He wasn't about to 'just throw some paint' on it.  I got sent to Home Depot to buy paint stripper and new paint.

Due to my tree hugging nature, I chose Citristrip Safer Paint and Varnish Stripping Gel, which is non-toxic and biodegradable.  What color paint should I use?  PEPSI wanted something in a soft baby green color, and HUBBY said to get it in a spray can.  We decided on Rustoleum Painters Touch Satin Finish Green Apple Spray Paint .  Since we were only painting the frame and not the shelves, I thought two cans would be enough.  Guess what?  I ended up going back for two more cans.

SUPPLY LIST

1 quart paint stripper
1 or 2 wire brushes
Fine grade sandpaper
Durable paint scraper or razor
Gloves
3 to 4 cans of good quality spray paint
1 Drop cloth
2 yards fabric (pre-washed and ironed)
Scissors
1 to 2 large bottles Mod Podge
Sponge Paintbrush
Screwdrivers

DIRECTIONS

STEP ONE - Use a screwdriver to loosen bolts, and remove all bolts, nuts, and washers from the changing table.  Keep all original hardware together, and replace any missing pieces.

NOTE - We had an incomplete set of hardware.  Since the project came to us disassembled, we didn't know that we were missing bolts.  After refinishing everything, I tried assembling the changing table and lacked quite a few bolts.  I bought replacements at Walmart but they wouldn't fit properly.  I took the entire project to TSC and consulted with their hardware salesman.  Sometimes a demonstration is necessary, so I brought the project inside the store and we began to assemble the frame and install one shelf.  He finally realized the problem I'd been having with reassembly. Upon careful examination of the replacement bolts, he found some of the heads of the bolts weren't centered on the bolt, and some were also crooked.  This happens when hardware is cheaply mass-produced in China.  I bought another complete set of replacement bolts, nuts, and locking washers at TSC.  Problem solved.  Hardware is important!


Changing Table Before Makeover

I wish I had an assembled "Before" photo to share, but honestly when we got the project it was already disassembled.  PEPSI and Grandma Sandy had already done a little paint removal, too.  As you can see, the paint on the shelves was hideous.  

STEP TWO - Apply paint stripper as per manufacturer's direction.  Wear gloves to protect your hands.


Changing Table Makeover Before


Obviously, the finish was in terrible condition.  It was a big project.  I had no idea how big until we were in the middle of stripping the paint off.  To begin with, HUBBY covered all the frame pieces with a coat of stripping gel, following directions on the label.  Then, it was time for some good, old fashioned elbow grease.   (That's a Southern term used to describe intensive labor with your hands.)

STEP THREE - If you use a gel type paint stripper like we did, use your wire brush to scrub the paint away.  

NOTE - We completely wore out two brand new wire brushes on this project.


Paint removal using stripping gel and small wire brush.

The reason this project was so labor intensive is because someone had tried to paint it before, and they'd done a TERRIBLE job.  I mean, it was downright horrendously painted with white paint.  I don't want to scare you away from taking on this kind of makeover.  Just pick your project carefully, and avoid something that has already been made over badly if you want to strip it down and make it look nice.  You just can't hide 'runs' in paint.  You know those little drip marks where there was too much paint and it dried in little drops?  You can't hide those when you paint over them.  You have to strip all those things away.  This table had several of those 'runs'.  Due to the beautifully beveled rails, finding all the runs was like solving a puzzle.

STEP FOUR - Continue paint removal using your scraper tool or razor if needed.  This works best for paint runs. 

STEP FIVE - Remove remaining paint and any small blemishes with the fine grade sandpaper.  If you want the finish to look really nice, the wood that you're about to repaint should not have any 'bumps' or 'runs' of paint.  It should feel smooth to the touch, even if you can't get 100% of the paint off.

STEP SIX - Measure your changing table shelves.  Ours were about 15" x 18".  Add four inches to the length and width and cut your fabric.  I cut pieces that were 19" x 22".  This will give you about 2" of overlap for your fabric to attach to the back side of the shelf.  Since my fabric was wide enough, I was able to cover three shelves with less than two yards of fabric.


Cutting layout for fabric covered shelves.

STEP SEVEN - With fabric right side down, lay shelf, right side down, on top of the fabric, centering shelf on fabric.  Dip paint sponge halfway down or less into bowl of Mod Podge and paint a strip of Mod Podge across the back side of shelf along short edge.  Neatly fold fabric over back side of shelf and apply to Mod Podge, pressing gently.  Now paint Mod Podge over top of fabric and overlap Mod Podge onto bare shelf.  This will keep fabric from fraying. Repeat process  on remaining three sides and allow to dry.


Reverse side of Fabric Covered Shelf with wet Mod Podge


Full view - back side of shelf covered with fabric and wet Mod Podge.


STEP EIGHT - When Mod Podge on back side of shelf is completely dry, you are ready to apply to front or top side of shelf.  It is easier to work with if you pour the Mod Podge into a bowl or other container with large opening.


Ready to cover shelves with Mod Podge


For me, the easiest part of the makeover was covering the shelves with fabric using Mod Podge.  I have to give PEPSI the credit for this idea.  I would've never thought of it.  Luckily, she liked this Jungle Baby Monkeys fabric from Hobby Lobby.  A few years back, I bought quite a bit of it for a project that didn't happen.  (Can I get an Amen Sister here?  Anybody else ever do that?)


STEP EIGHT continued - Starting on one side, apply a layer of Mod Podge to the right side of the fabric on the top or front of the shelf. 


Covering shelf with Mod Podge


STEP EIGHT continued - Continue painting Mod Podge across the shelf and fabric using straight strokes, working from one side to the other.  Spread it as evenly as possible with sponge brush.


Covering shelf with Mod Podge

NOTE - Fabric will appear whitish and shiny when you are finished applying Mod Podge.  This will dry very nice and clear.

Shelf covered with wet Mod Podge

NOTE - When fabric is covered with Mod Podge and pulled tight, it may stretch a little, resulting in a few wrinkles like this one.  


Wrinkle in fabric covered shelf


STEP NINE - Using a drop cloth and gloves, lay out pieces to be painted and apply paint as per manufacturer's directions.  Don't try so hard to get 100% coverage on the first go-round or you may end up with runs!  Paint one side and allow to dry completely before turning over to paint reverse side.  

STEP TEN - After paint is 100% dry, apply a second layer of paint as shown in STEP NINE.

STEP ELEVEN - When your paint and Mod Podge is completely dry, assemble your finished Baby Changing Table.


If you decide to do one of these Changing Table Makeovers yourself, I would love to see your before and after photos!


We were so happy with the way ours turned out, we couldn't wait to bring it to PEPSI for her and our new grandson to use.


He looks so adorable.  There is nothing on earth that is sweeter than a brand new baby.


New grandbaby on finished Changing Table.


I really appreciate PEPSI sending me these photos of him on his newly refinished Jenny Lind style Baby Changing Table.


PEPSI has all her supplies neatly stocked on the shelves for her new baby boy.


Can you tell we are proud grandparents?


Our adorable grandson. What a blessing!


I sure love this baby boy!!  Peekaboo!

This post is shared at:


HLM Interior Design Wonderful Home Decorating Wednesday Link Party