Sunday, August 26, 2012

There Is No One Perfect Way To Be A Good Mother

Great advice on being a good mother:


No one perfect way by Little Family Fun


To all the Mothers out there reading this post: You are beautiful!  God bless you!  The message above is a  Quote from THIS talk.

This post is shared at:


Tuesday, August 21, 2012

50 Lunch Totes and Bags with Tutorials - The DIY Lunch Collection

Whoever said that there is no such thing as a free lunch was right.  However, here is something that I like even better.  I'm sharing a collection of DIY Lunch Bags and Lunch Totes.  All of them are FREE and include tutorials and/or patterns that are FREE too! 


Why buy a new lunch kit or tote when you can make on as snazzy as these are?  Seriously.  For months now I've been pinning these on my Accessorize, Accessorize Board on Pinterest


I love the Chic Lunch Tote.  Pack your lunch in this and you'll look fabulous while you dine.

Chic Lunch Tote Tutorial on Pinterest


Chic Lunch Tote by Bag'n-telle 


This free combo pattern can be made into a smaller size that fits perfectly for your lunch or a much larger size to carry to the gym. 

Lunch Bag and Gym Bag Free PDF Pattern on Pinterest


Lunch Bag and Gym Bag Combo PDF Pattern from Sew, Mama, Sew!


What a fun Notebook Lunch Bag!  Use a metal clippie as your closure and make it fun with something witty or cute on the front.


Notebook Lunch Bag Tutorial on Pinterest


lunchbag-text

DIY Notebook Lunchbag by Design Sponge


The details on this bag blend fashion and function.  Running the straps all the way down gives it added strength, and the button closure is handy.  I like the fact that you can use the button and not have to make any buttonholes.


Lunch Bag Tutorial on Pinterest


Lunch Bag by Belly Buttons Boutique


You may think this Juice Pouch Lunch Bag is just for kids.  I would totally make one of these and use it at work for my own personal lunch bag.  Recycling is for everyone!

Recycled Capri Sun Pouch Lunch Bag Tutorial on Pinterest


DIY Recycled Juice Pouch Lunch Bag by Foodista 


Need to keep your stuff hot or cold?  How about this Insulated Lunch Tote?  It is strong, functional, and fashionable.

Insulated Lunch Tote Tutorial on Pinterest


Insulated Lunch Tote by Zaaberry


This Lunch Bag is like some of the simpler bags, but comes with strap handles and a string closure.   It is suitable for kids or adults, depending on which fabrics you use.

Lunch Bag Tutorial on Pinterest


Lunch Bag - tutorial coming soon ;)


Lunch Bag by Pink Penguin


When I saw this hot pink shiny Lunch Bag Clutch I fell in love.  Okay maybe the hot pink is a bit bold for me, but I would love one in red, black, blue, purple...well you get the idea.  It even has a hidden magnetic closure!

Lunch Bag Clutch on Pinterest


DIY Lunch Bag Clutch by just angelina 


This sweet little Lunch Tote is simple and straightforward.  I love the use of grommets with the handles.  Easy peasy! 

 Lunch Tote Tutorial on Pinterest


 Lunch Tote by SerendipitiJoy 


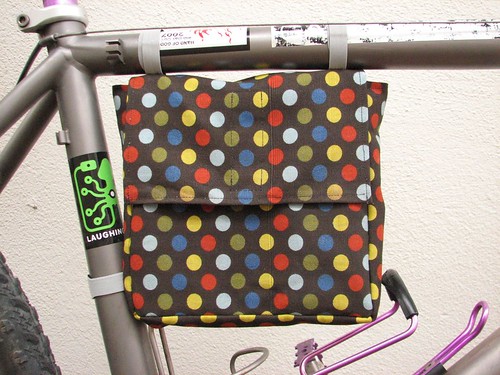
How handy is this Lunch Bag that attaches to the frame of your bike?  I love it!

Bike Frame Lunch Bag Tutorial on Pinterest


Bicycle lunch bag

Bicycle Frame Lunch Bag by Evil Mad Scientist


Sewing with oilcloth is so popular now.  Using it to make a lunch bag would be a great project, especially if you haven't used oilcloth before.  This one is a very basic bag pattern.

Oilcloth Lunch Tote on Pinterest


 Oilcloth Lunch Bag by Skip to My Lou


Here is an Oilcloth Lunch Tote with handles.  It is pretty basic, but the handles make it easier to carry.

 Oilcloth Lunch Tote Tutorial on Pinterest


 Oilcloth Lunch Tote by Zaaberry


 For the dinosaur fans, here is a basic lunch bag tutorial with a Jurassic flair.

Jurassic Lunch Bag Tutorial on Pinterest


Jurassic Jaden Lunch Bag DIY by Hip Hip Hooray


 DIY Leather Lunch Clutch Tutorial on Pinterest


The Lunch Bag Clutch can be made of vinyl or leather, and is one of the more fashionable pieces in this collection.


 6906595068_4a8c0ce9c5_b

DIY Lunch Bag Clutch on DDGDaily 


This lunch tote is cute and easy.  The button is just for decoration.  The closure is made with velcro.

Reusable Cloth Lunch Tote Tutorial on Pinterest


 Reuseable Cloth Lunch Tote Tutorial by Memoirs of a Marine Corps Wife


How about a collection of 10 Lunch Bags?

10 Free Lunch Bag Tutorials on Pinterest


lunch11 DIY Lunch Bags: 10 Cute, Simple, and Free Tutorials to Make Your Own Lunch Bags

 DIY Lunch Bags: 10 Cute, Simple,and Free Tutorials to Make Your Own Lunch Bags by Babble


And guess what? There are 30+ more Lunch Bags, Totes, and Accessories here! 

30+ Lunch Tote Tutorials and Free Patterns on Pinterest


30+ Lunch Bags, Sacks and Accessories {Free Pattern} by Tip Nut    

  Have fun and enjoy your lunch!


Saturday, August 18, 2012

Family Photos - Priceless Gifts to Share

Some time ago, I received a surprise in the mailbox.  


My brother Eddie, Dad, and I at the Roderick Family Reunion circa 1970


My cousin Kathryn had been going through some old photos and found some of my father, L.E. Roderick, my brother, and me.  Thinking we might want them, she put them in an envelope and mailed them to me.  What a gift!


If you have duplicate photos of other family members or have some you cannot keep, I hope you can send them to that family.  You might not even realize how much a simple gesture like that will mean to them.


My handsome Dad, the school teacher


Kathryn was so sweet to send these to me.  What a priceless gift she has given us.  On the back of this one, his name is written in cursive.  Under his initials, the name "Lenny" is written in a different color ink.  


Dad's school photo with a more casual look - no suit jacket


Dad had several nicknames.  In fact, his mother and father did not agree on what his name should be.  His father said that his mother could name him whatever she wanted to, but that he (his father) would call him "Tom".  All the brothers and sisters and nieces and nephews and cousins called him Tom.  His mom must have eventually given in, because she called him Tom too.  
Dad was a lifelong teacher.  He taught school in Missouri and was a school principal in Oklahoma. When he moved to Texas, he had to apply for some kind of state certification to teach.  One requirement was his birth certificate. Dad was born at home, just like all the rest of his 11 brothers and sisters.  When he got the birth certificate, the place where his name SHOULD be was blank!  Imagine that.  He actually filled out his own name on his birth certificate so that he could submit it to the state of Texas for his certification.  So, his given name was Leonard Edward.  As a youth, everyone called him Tom.  When he enlisted in the Air Force, he was given a new nickname "Rod" which was his surname "Roderick" shortened.  That stuck with him throughout his military service and professional career.  And I never knew until I read the back of the photo that anyone called him Lenny. 


Perhaps coincidentally, we recently got a surprise visit from our brother-in-law, Ronny.  Ronny was married to HUBBY's sister, who has been in heaven for a couple of years now.  Ronny got a new Harley Davidson motorcycle and has been enjoying riding it all over the place.  So glad he decided to ride over and see us.


Ronny mentioned that he had a lot of family photos to share with HUBBY.  Well, a couple of weeks ago, he got on his Harley and came back with a load of precious family photos for us.


Louise Pettey as a young woman, perhaps circa 1930's


HUBBY's mom went to heaven when he was only 14, so we don't have a lot of photos of her.  We don't even have many of him as a youngster.  We were both so excited.  We even got a photo album and high school yearbook of hers.


Louise Pettey "at hospital"


On the back is the simple caption "made at Hospital".  I wonder if she was visiting someone here.  Perhaps she volunteered or worked there.  I wish we knew which hospital this was.


I will assume that this was made in at Elmendorf Air Force Base in Anchorage, Alaska.  That is where HUBBY was born.  I will assume the photo was taken circa 1955.


Louise with her three sons, Alan, Randy, and baby Doyle aka HUBBY.


Although the color is way off on this one, it was too darned cute.  It was taken around Christmastime  1954.  Precious!  Those boys are adorable.


Doyle's First Christmas - with brother Randy (right) and Alan (left)


How could I possibly find the date?  It was stamped on the back of the pic.  I hope everyone reading this makes some effort to put dates and names on their photos.  It will help others SO MUCH later on.


Scrapbooking is such a popular hobby.  This photo album looks like the predecessor of a modern day scrapbook.  It has a cardboard cover and black rectangular paper pages that feel a bit like old manila paper.  No pockets or protective covers for the photos.  Louise used a white pen or marker to write on the pages of her album.  The glue on some of these gave out long ago. I love the photo on the top left taken on an old bridge somewhere.  The hats and the legs are splendid!  I wonder of the photo of Louise in the center with (Boots) in the caption means she was wearing boots, or was it her nickname?  Probably a nickname, because her friend Bobby Joy Partin has the same caption with a different name (Babe).  No doubt they were "Boots" and "Babe". 


The name of the girl on the bottom is cut off.  My scanner is just not big enough to capture the whole page.  Her name is shown as Dorothy Rawlinson.  The caption on her photo "School Days 1939-40".


We have learned so much from a couple of dear relatives taking time to share some family photos with us.  I must also include a cousin of HUBBY's we re-connected with when attending a family funeral.  He shared this photo with us via email.


This is the only photo any of the family has with HUBBY's father and air force crew in front of their airplane, a B 24 Bomber.  If you want to read more about him, more details are given here:  1940 Census - Ride the Time Machine.


In closing, the purpose of this post was two-fold.  The first was to encourage you not to dispose of old photos.  If you have more than you need or want, offer them to others that might appreciate them.  The second was to share a little bit of our own family history.  I hope by sharing it you'll see what I've been able to learn, and what is still unknown, from our new 'old' photos.  Perhaps by seeing our experience here, you'll be sure to mark your photos with dates and names.  Preserving history is important.  What is most important is your own family history.  I believe it is absolutely priceless.


Thanks for reading, and take care of those old photos please! 

UPDATE August 31, 2012

 I was contacted yesterday by a cousin, CHRISTOPHER, that found me online through www.findagrave.com.  CHRISTOPHER's Great-Grandmother ETHEL is a sister to my Grandfather LEONARD RODERICK.  CHRISTOPHER has only a few photos of ETHEL and no idea of what she looked like as a child or young woman.  All their family photos were burned in a house fire during the 1950s.  Our family has had a website on www.MyFamily.com for some time now.  I was able to retrieve these photos for Christopher from the site.  The reason I had access to them was because my cousin LEON had SHARED them by posting them to a photo album on www.MyFamily.com.  Thanks LEON for SHARING FAMILY PHOTOS!!


Ethel Roderick, my great aunt


My grandmother Gracie Arleen Baker (the future Mrs. Leonard Roderick) with her future Sister-In-Law Ethel Roderick.  Gracie is top row center (someone wrote Mom with arrow pointing to her) and Ethel is seated far left front row.  This is the Pleasant Ridge School in Upton, MO circa 1900.


Detail of Pleasant Ridge School Photo circa 1900 (above)


Thursday, August 16, 2012

Baby Stuff - Best Onesie Makeovers on Pinterest


 I'm sharing a collection of favorite Onesie Makeovers that I first found on Pinterest and pinned to my board Nanny's Kids - Sew Much Love.  There are so many good ideas out there, but it takes time to search for each one and evaluate them.  Are they tutorials?  Are they just photos with no directions?  I love to sew and craft.  Personally, I like a good set of written directions with photos.  All of these sweet little projects are easy and come with great written directions.

Baby Stuff - Best Onesie Makeovers on Pinterest


You'll find links to my pins (in the title) and links to the original websites (in the caption and on the photo) where the details and instructions are posted by the geniuses who created them.  I spent a lot of time developing this collection.  Hope this Best of Pinterest Onesie Makeover Collection is a timesaver for everyone out there looking for instructions and ideas.


Candy Corn Onesie Tutorial on Pinterest


This No-Sew onesie reminds me of Fall and Halloween.  The colors could easily be changed for other seasons - pastels for Easter or Spring, reds and pinks for Valentines, etc.  It would be cute for a boy or girl.


Candy Corn Onesie by The Swell Life


Vest and Tie Onesie Tutorial on Pinterest


This dressed up Vest and Tie Onesie is perfect for photo-ops, church, or any other reason you choose to get the little ones all gussied up.  It is actually an applique she created with fusible webbing and fabric from a soft, well-worn man's shirt.

Vest and Tie Onesie Applique by lemon tree creations


10 Minute Onesie Dress Tutorial on Pinterest


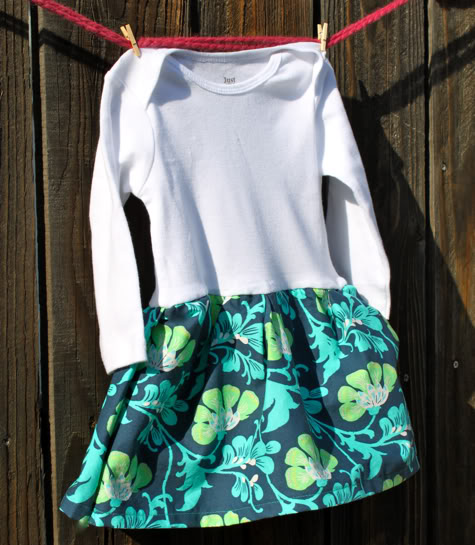
This 10 Minute Onesie Dress is by Jaime of Prudent Baby.  It is really very easy to make.  There are so many different fabric and embellishment options available for this one, the only trouble you'll have it trying to choose the one you like best.

10 Minute Onesie Dress by Prudent Baby


Bow Tie and Suspenders Onesie Tutorial on Pinterest


I call this the Bow Tie and Suspenders Onesie.  Tiffany created it and she refers to it as the "BABY NERD SHIRT".  So sweet and easy to make.  I think it would be perfect for church wear, parties, etc.


Bow Tie and Suspenders Onesie by making the world cuter


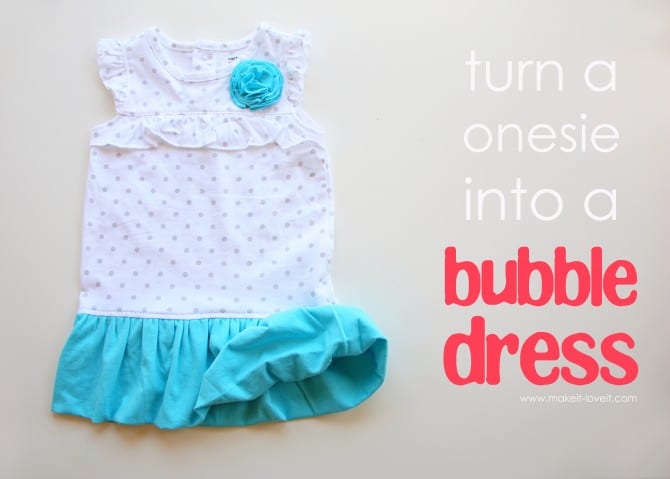
Bubble Dress Onesie Tutorial on Pinterest


This Bubble Dress Onesie is very easy too.  It is a bit different than the 10 Minute Onesie Dress, because you actually cut the snap bottom off the onesie when you add the skirt.  The flower embellishment that matches the skirt is the perfect complement to the dress.

Bubble Dress Onesie by make it and love it


Shirt and Tie Onesie Tutorial on Pinterest


The Shirt and Tie Onesie is so easy and the post includes a pdf pattern for the tie.  Just use Wonder Under to attach it, sew around the edges, and you're done.  You could make two or three of these at the same time to match different outfits.

Shirt and Tie Onesie by Crap I've Made


Ruffle Bottom Onesie Tutorial on Pinterest


This Ruffle Bottom Onesie is so sweet.  I love ruffles on girls, don't you?  What makes it so easy is the use of organza ribbon to create the ruffles.  By using ribbon, the edges are already finished and they don't fray.  Genius!


Ruffle Bottom Onesie by Free Baby Projects


Football Onesie Tutorial on Pinterest


This Football Onesie makes me smile.  Just pinned it today!  The part I like best is that this is a No Sew Onesie.  You won't believe how easy it is to make till you read the instructions!


Football Onesie by Fabulously Domestic


Ruffle Onesie Dress Tutorial on Pinterest


I think Onesie Dress was actually my first Pinterest project.  It was definitely the first dress I made for my own sweet granddaughter, TINKERBELL.  I wish I had a photo to post for you.  We used purple Disney Tinkerbell fabric for the skirt and that purple minky fabric from Hobby Lobby for the ruffle trim.  It is adorable, just like this little dress.

Ruffle Onesie Dress by barefoot in the kitchen

I hope you enjoy this collection.  Please let me know if you are inspired to make one.  I have another grandson on the way and I just can't get my mind off baby stuff.  Babies are the best, especially grandbabies!

Saturday, August 11, 2012

Grandma JoAnn's Incredible Peach Cobbler Recipe

This special Peach Cobbler recipe has a lot of affection and sweet memories associated with it.  The kids all called her Grandma JoAnn, but I just called her Mom.  She wasn't just your average Mother or Grandmother, and this is no ordinary recipe.  Trust me.


I've been eating this cobbler all my life, but I didn't learn Mom's recipe for it until HUBBY and I were dating back in the early 1980's.  I'm not saying it made HUBBY jump up and propose right then and there, but I'm sure it helped quite a bit.  HUBBY and his Father happened to be at the house the day Mom came for a visit.  For some unknown reason, she decided to make a batch of her famous cobbler.  Father and son both got a taste and fell in love...with the cobbler:)  Fortunately, she wrote down the recipe for me.


Grandma JoAnn's Peach Cobbler Recipe, handwritten (front)


Believe it or not, the first couple of times PUMPKIN served this cobbler at her YSA Branch, she got a few marriage proposals.  The condition was that she cook this Cobbler for them every Sunday.  In all truth, the dessert never made it through all the meetings untouched until the actual Linger Longer or Break the Fast began, and there were never any leftovers to bring home.


Grandma JoAnn's Peach Cobbler Recipe, handwritten (back)


 You can tell by the condition of the document that it is about 30 years old and well used.  I think it was written on the card at the back of her checkbook.  I love it because of the ambiance it has for me.  Do you have any special recipes like this that mean a lot to you?


 Grandma JoAnn's Incredible Peach Cobbler Recipe


  • 1 cup flour
  • 1 cup granulated white sugar
  • 3 teaspoons baking powder
  • Dash salt
  • 3/4 cup milk
  • 1 quart canned fruit, drained or 1 large (approx 29 oz size) can store-bought fruit in heavy syrup, drained (peaches, pears, apples, or your favorite fruit)
  • 1 stick butter or margarine 


Preheat oven to 375 degrees Farenheit.  In a medium sized bowl, mix dry ingredients together.  Add milk to dry ingredients and stir until  batter is smooth.  Set aside.  Divide butter into two equal halves. Use a little of the first 1/2 stick of butter to rub all over the bottom and sides of the pan.  Then cut or chunk the rest of it into small pieces about the size of a nickel and distribute all over the bottom of oblong 13"x9" cake pan. 


Pour batter into pan.  


Cut or chunk up the second 1/2 stick of butter and distribute it evenly over the top of the batter.  I like to put the bigger chunks in the corners of the pan. 


Add drained fruit, distributing it evenly over the top of the batter and butter.


Bake in oven for 30 minutes or until brown.  Toothpick test for doneness by inserting toothpick into batter when you think cobbler is done.  Remove toothpick and inspect.  No batter should be stuck to the toothpick if cobbler is completely done.  


Use a spatula to cut into serving size squares. Serve warm with whipped cream or a scoop of vanilla ice cream.


For flavor variation, add a teaspoon of cinnamon to the dry ingredients or drizzle a tablespoon of honey over the fruit and batter before baking.  Enjoy!

In closing, I have to give some credit to my blogger friend Hanna, also known as Cupcake Mumma.  Her decision to have an America day prompted me to share the recipe.  I hope you give it a try.  It is powerful stuff, so don't serve it to someone unless you are prepared for them to fall in love with you and this cobbler.  It might just lead to a marriage proposal or two. 

This post is shared at:

The Country Cook: Weekend Potluck #63 

The Gunny Sack Link Party #50
  
The Country Cook Weekend Party #35
    
Mrs. M's Recipe Link Party August '12