Thursday, August 9, 2012

DIY Young Women Value Color Bracelets

YW Value Color Bracelets Tutorial


Our Beehive Class is learning about the Young Women Values.  Each Value is represented by a different color.  Each has spiritual significance and helps the girls with their Personal ProgressFaith is white.  Divine Nature is blue.  Individual Worth is red.  Knowledge is green.  Choice and Accountability is orange.  Good Works is yellow.  Integrity is purple.  Virtue is gold.


As a Beehive Class activity, we discussed the values, meanings, and colors.  While we talked we made these simple bracelets in the Young Women Values Colors.


You don't need a ruler for this craft.  I just wanted to give you an idea of the size of the embroidery thread packages.  The small packages are about six inches long.


You will need one package of thread in each value color, one ring for each bracelet, and scissors.  Even after you remove the thread from the package, natural folds every six inches or so are easy to spot.  You'll need eight strands, one in each color.  Each strand should be about eighteen inches long, which is equal to three folds so you don't really need to measure it.


This photo shows everything we used except for the scissors.


You now have eight strands of thread.  Each strand is about eighteen inches long.  Divide the eight strands into two groups of four strands.  Whatever colors you want to put together is fine, just divide them up into two sets of four colors.
Even the ends on the first set and fold in half as shown below.


Push the center of the fold through the ring as shown below.


Then bring the two loose ends through the hole as shown and voila.  Your threads are attached to the ring.


This shows both sides done.  What I am NOT showing is the fact that I did them backwards a couple of times before I got it right.


The bracelet on the right is braided, knotted on both ends, and complete.  The bracelet on the left is incomplete.  You can braid these or knot them or put beads on.  Whatever you like is fine.


This was the first bracelet I completed.  I really like it.


My Beehive class and I had so much fun making these.  Some are braided and some are simply knotted a bit.  I love them.  I love these girls even more!


 This is was such an enjoyable activity.  Try making one for yourself, for a friend, or with your YW girls.  If you do, please tell me about it!

Thursday, July 19, 2012

DIY Keepsake/Vial Necklace

The Setting

Just a quick hello from guest blogger Melody! Recently, I had the privilege to accompany my parents and very young niece to see Cathy Rigby Is Peter Pan! in Dallas at Fair Park. Cathy is such a fantastic performer, and of course the show was fantastic. This, however, is no review. Part of the magic included after the show, Peter Pan signs autographs by the exit to support a charity, and passes out fairy dust (foil confetti) to the children as they leave. Of course, all four of us got into the gigantic line to get our playbills signed. As we neared the front, one little girl dropped some fairy dust on the ground. As she went to pick up all the tiny pieces, she realized that the fairy dust from the show was EVERYWHERE. People had trailed it out into the lobby as they left, and I imagine lots of people must have dropped some while making their way towards the exit. This adorable little girl began to pick up every little piece of fairy dust she saw, exclaiming that, "Peter's gonna need it to fly! I'm going to put it back in the bucket," as her parents tried to coax her off the floor and out towards the car.

The Muse Strikes

It was then that my niece and I both separately began to worry about what we would do to keep it as a reminder of our fantastic night. On the way home, having realized we both wanted to hold on to the magic as long as possible, I offered to make a necklace to keep some of it in. I'd seen necklaces with 'fairy dust' on such internet sites as etsy and thought, "You know, it can't be that difficult." Turns out, it isn't! So follow along as I give you a few pointers on how to hold onto some magic of your own.

The Process:

Step 1: Gather the necessities.

(1) Cork and Vial Pendant, available at craft stores.
(1) Measure of Necklace Cord, length of preference [Leather lace does well to hold knots]
(1) Scoop of Magic, whatever form it takes for you.

Step 2:

Start with your pendant, open. This is a vial from a package of (2) two cork-topped vial pendants from Hobby Lobby.

Step 3:

Add your measure of magic. Here is mine, spilling out of the playbill. Those foil squares were a bit difficult to fit into the vial, but crunching them down like paper into a trashcan fit lots, and gave the shine more dimension.

Step 4:

When finished, dab some craft glue round the upper half of the cork's surface  where it will meet the vial, and close it tight. Adding a bit of glue to the base of the metal loop in the cork wouldn't hurt, either, just for extra help keeping it all together.

Step 5:

Measure out a little more chord than you will need and cut. Thread through the loop in the pendant. Now, you can leave the vial loose to slide along the chord or keep it stationary. I chose to knot it down at the base with a good square knot. Then, another at the top, leaving room for the head to fit through the necklace. I felt it was missing something, so I added another piece of chord below the mouth of the vial for trim, wrapped twice around. Tighten all the knots and trim the excess!

Voila! She is finished!

Honestly, the picture doesn't do it any justice, I'm just a terrible still-life photographer. I'm good with people, pets even, not... Stuff. Hahaha. Anyway, I hope any reluctant crafters out there will find this a helpful confidence boost. This really is one of the easiest projects I've ever done. Posting this blog entry easily took me 4 times as long to finish ;)

Thursday, July 12, 2012

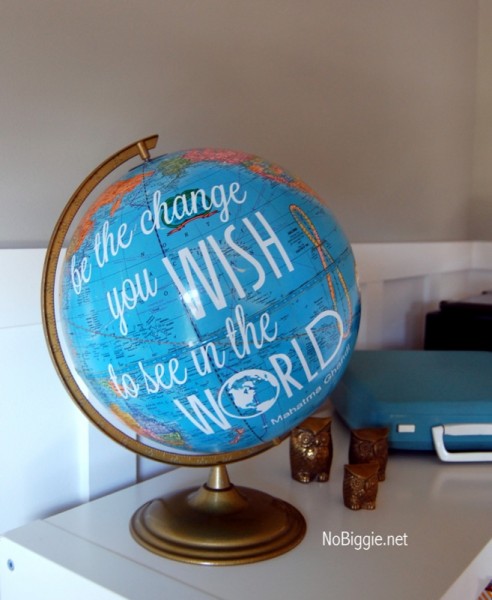
Be the change - Gandhi quote and free printable by no biggie


This beautiful quote globe with a free printable designed for Silhouette on Pinterest inspired me.  The quote is by Gandhi, and the post Favorite Gandhi Quote (free printable) plus Silhouette promo is by no biggie .  Wow, just had to share it.  

She did one for the globe and did another to put in a picture frame.  I love them both!  Click on the link above for her tutorial, free printable, and promotion.

"Be the change you wish to see in the world." - Ghandi

For a moment, just imagine a world filled with people just like you and me who actually became a change for the better of our world. Pondering Gandhi's words brings to mind my own fav quote. "Never doubt that a small group of thoughtful, committed citizens can change the world.  Indeed, it is the only thing that ever has."  - Margaret Mead


I hope you feel empowered by these words.  No matter who you are, you can make a difference.